Creating Smooth Animations in Navisworks.
If you haven't already seen this, John has some great tips here on rendering animations in Navisworks. A nice touch rendering his clash results too!
I wanted to add to this with a quick tutorial of my own, showing how you can create smoother animations using Animator.
Isn't Animator for Object Animation? Well, yes, but you can also animate the camera too. And the interactivity of the Animator timeline gives you much more control over the animation. Let me explain…
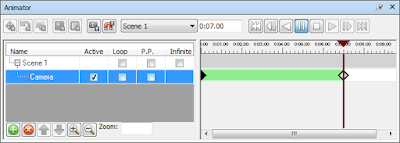
- Create an Animator Camera - the Animator camera timeline is defined by keyframes (similar to how John used Viewpoints in his tutorial).
- Create your Base Keyframes - you can either create the keyframes directly in Animator, or you can import your base keyframes from an existing Viewpoint Animation (particularly useful if you record your navigation, such as walking, or using the turntable/constrained orbit).
- Edit the Duration – you can drag the keyframes along the timeline to reposition them (the last one defines the overall animation duration). This also provides a means of moving any keyframes in-between the first and last, speeding/slowing that particular section – this level of control is much, much more difficult (practically impossible if I'm honest) to achieve in the Saved Viewpoints window. Moving keyframes closer together will speed up the transition between them; moving them further apart will slow the transition down.
- Review the Animation – you can easily move the playhead (vertical black bar) to any position on the timeline then click Play to quickly review the edits you're making.
- Insert Intermediate Keyframes – move the playhead approx. half way between two keyframes (as you drag the playhead, you'll see the main view update). Use the navigation modes to adjust the current viewpoint. This could be as simple as walking backwards a bit; or you may want to Pan the camera, use Look-Around, etc. Capture this intermediate view as another Keyframe.
The above will create decent results, but you're still left with very linear transitions between each keyframe. I use an additional step to smooth these transitions out.
Now when you playback the animation, this additional keyframe will help to smooth out the transition. Depending where your first and last keyframes are, you may want to add more intermediate frames, but 1 will usually be enough.
There are all sorts of effects that you can create using the timeline in this way. For example, if as part of a fly past you want to slow down (Matrix slow-bullet style) to highlight something important, then move the playhead to the point of focus…
The camera will transition at normal speed between position A and F1, then slow down between F1, F2 and F3, then return to normal speed again between F3 and B.
Try it out for yourselves. I'd love to hear your feedback. Or why not post your results to YouTube and share the fruits of your labor with us all.
for more information please visit link in below.


Comments
Post a Comment
Please follow my Blog.
Thanks