Posts

Showing posts with the label Navisworks.

How to Exporting File from Revit to Navisworks.

Image
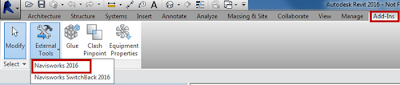
When you export your Revit model to Navisworks and open up the file and append the exported Revit link models, you notice that the objects are not lined up properly almost like the different Revit files have different coordinates. when you review your project inside Revit you notice that it seem perfectly lined up. You will need to change your export to Navisworks settings. To do this open your project in Revit: Here is a list of the export utility   http://www.autodesk.com/products/navisworks/autodesk-navisworks-nwc-export-utility Verify in your project that your Revit links were all brought in using origin to origin. Go to the Add-ins tab on the ribbon Go to the External Tools drop down menu and click on Navisworks to start the export command.  In the Export Scene as... dialog box, click on the Navisworks Settings...button to open the Navisworks Options Editor - Revit 5. In the Navisworks Options Editor - Revit dialog box expand File  Readers> and click on

CREATING AND EXPORTING ANIMATIONS ON NAVISWORKS.

Image
Step 1: Creating Viewpoints for animation.  Under the Viewpoint tab on the main toolbar, you can create various viewpoints for your fly-through, focussing on different parts of the building at different times in the simulation. Set up your view, and then click on the ‘Save Viewpoint button’. The Saved Viewpoints bar will open up on the right showing you the different viewpoints you have saved. After you have a few viewpoints saved, you can create the animation. Step 2: Creating Animation and linking to Simulation Go to the Animator tab, and set up your first view. Click the ‘Record’ Button, and click on your different views in the order you wish them to appear. After you finish, click the stop button. Your animation is now saved on the right. Click on it and delete the Cut buttons that appear in the drop- down under it. This will ensure a smooth transition between views. Now we link the simulation to the newly created animation. Under the simulate tab, click th

Creating Smooth Animations in Navisworks.

Image
If you haven't already seen this, John has some great tips  here  on rendering animations in Navisworks. A nice touch rendering his clash results too! I wanted to add to this with a quick tutorial of my own, showing how you can create smoother animations using Animator. Isn't Animator for Object Animation? Well, yes, but you can also animate the camera too. And the interactivity of the Animator timeline gives you much more control over the animation. Let me explain…

Top 10 Benefits of Autodesk Navisworks.

A few weeks ago, BRS added a new tool to our digital design capabilities. In acquiring the Autodesk Navisworks software, BRS has not only enhanced its set of tools, but it’s fundamentally improved the way we share 3D information. Our main 3D modeling program is Autodesk REVIT, and until now all 3D coordination has been done in REVIT itself. A program like REVIT contains an incredible amount of modeling information, drawing sheets, schedules—not to mention considerable 2D information. Consultants’ REVIT models also carry a similarly large database and reviewing models within REVIT can be cumbersome, to say the least. Enter Navisworks. Navisworks is not a 3D modeling program but a program that converts large REVIT 3D model files into smaller 3D models that are far more manageable for a multitude of team members. It gives BRS a more efficient tool to review and resolve differences between multiple consultant models. Navisworks is a powerful desktop application that can filter and sep