Selecting Elements in Revit.
Many of the controls and tools that you use to modify an element in the drawing area are only available when an element is selected.
To help you identify elements and mark them for selection, Revit includes an automatic highlighting feature. When you move the cursor onto or near an element in the drawing area, the outline of the element is highlighted. (It displays in a heavier line weight.) A description of the element displays on the status bar at the bottom of the Revit window. After a brief delay, the element description also displays within a tool tip just below the cursor.

Wall element before and after highlighting
When an element is highlighted, click to select it. When an element is selected in one view, the selection applies to all other views as well.
Tip: If you have difficulty highlighting a particular element because other elements are in close proximity, press Tab to cycle through the elements until the desired element is highlighted. The status bar identifies the currently highlighted element. Press Shift+Tab to cycle through elements in reverse order.
When you select an element:
- The element is outlined in the color specified in options.
- Any element-specific editing controls and dimensions display on or adjacent to the element.
- Applicable editing tools are available on the Modify | <Element> tab.
- The selection count on the status bar (
 ) displays the number of elements selected. (See How Many Elements Are Selected?)
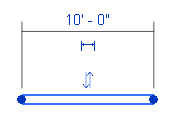
Wall after selection
Note: You can right-click a highlighted element to select it and display its context menu.
Source :
Comments
Post a Comment
Please follow my Blog.
Thanks